


This short vacation in northern Italy felt a bit like a slow-motion repeat of a trip I made to Portugal last November.
Back then, I spent a day going down a river (rafting in this case), ziplining and going on an 'Alpine Coaster'.
This time, I went ziplining one day, went down a river (canyoning in this case) the next and then rode an 'Alpine Coaster' on another day.
Although I added some very minor 'island hopping', a quad tour and a mountain walk to fill the extra time.
I had been in Milano earlier this year, but didn't spend much touristic time in the city itself, but headed towards Monza racetrack and the Swiss Alps instead. As I had been to Milano before that (back in 1999 and in 2006), I had seen the main tourist attractions before, so I didn't do that much sightseeing there this time either. But at least I managed to have a quick after-dinner visit to the Duomo and the 'Galleria Vittorio Emanuele II', a kind of early 'shopping mall'.
Something that hadn't been there in 2006 was the 'Vertical Forest', two residential skyscrapers, which feature a large amount of trees on their balconies, giving the place a 'green' look.

But my main destination (or, sort of, 'base of operations') was the town of Baveno at Lago Maggiore. There was nothing special about Baveno that attracted me, but it was conveniently located for the things I wanted to do.
The first being ziplining.
I had been on two long ziplines (more than a kilometer) before - one in Brazil and one in Portugal and when I found out that there was one close to Lago Maggiore, I wanted to go there. (In fact, that was the main reason for going to the Lago Maggiore area. Everything else I did was along the lines "so, what else is here to do?".)
The zipline there is fantastic - 1.8 km long, connecting two mountainsides. You 'fly' across a valley, 350 meters below you and the scenery and the view across it is great.

The main challenge is getting there.
The road to the zipline is a twisty mountain road. And the last couple of kilometers are single lane with few points that allow passing.
And that's the easy road.
Nice views, though.

You can approach them from the other side, but the one-lane road gets seriously twisty that way. And it stays single lane for much, much longer.
There's a reason why they give you clear instructions how to get to their place...
Although it is not as bad as I made it sound. They are proper concrete roads with guard rails and everything, not gravel roads with deep, unprotected drops at the side. But driving is slow and tedious, as there's little to none visibility at the corners, so it took me almost an hour to get the 25 km from the lake side to the zipline site (though just 35 minutes back).
In any case, by the time you arrive there, the most adrenaline filled part is already done.
The place is quite recent, having been built only two years ago, so it had its first full season only in the previous year.


The technical setup is quite like the one used in Portugal - similar start, similar pulley system, similar braking system at the end.
But at Lago Maggiore they have one special feature - you have a choice of "flying styles".
You can zip along the line while sitting in a climbing harness (like I did in Brazil) or you can do it lying down (like I did in Portugal). Lying down (which they call 'Falcon style'), you're a bit faster. And if you are in a climbing harness (which they call 'Freestyle'), you have a bit more freedom of movement and can move and look around more.
I did both.
I started with the climbing harness version.
Differing from Brazil (where they used a regular sport climbing harness), they were using a 'work harness', which has shoulder straps, making the ride a lot safer. If you wanted to, you could probably even do summersaults while ziplining.
One clever feature was a little triangular 'handlebar' (like you might have in a tram) to hold on to.
You didn't need to, of course, but when I had been ziplining in Brazil, I started to rotate and ride backwards. And it was tricky to rotate back into a 'look where you are going' position by swinging the arms and legs around.
So if you wanted to make sure that you kept riding forward, you could grab the handlebar and have more control over which way you're facing.
Or, according to the guide "you can also put your feet up there and ride upside down".
Aehm, yes...
I preferred to go with my feet firmly pointing downwards.
Ready to go.


On my way...


The altitude difference between start and end is about 270 meters, so the ride is fast, even when hanging in the harness. I had my GPS in the pocket and the speed got up to 105 km/h.
So back to the ticket booth and getting ready for the next ride.
They have a discount system. So while the first ride is full price, all later ones only cost half. But they don't sell you multiple tickets at the beginning, since every ticket has a time slot assigned. With the 'ride again' tickets you get the next available time slot, probably so you can't have the whole day blocked by people with half-price tickets. It wasn't a problem, though. I was there on a regular weekday and there wasn't any big crowd, so I was always able to get one the next bus to the 'launch site'.
It didn't take long and I was on my second ride, this time going 'Falcon style'


As expected, the ride was even faster than the first one, with a top speed of 120 km/h.
You don't get to see as much, though, as you are looking down and you barely can lift your head up to horizon level. But it's a lot better for videos. I had a 360° camera with me. And if you watch the video of the first run with a VR headset, it is disorientating, since the camera swings all over the place and the video is only good for extracting still frames. While riding 'falcon' is almost like being on an inverse dolly track, allowing for nice, steady videos.
Time for the third ride.
I had done 'sitting in a harness' and 'flying falcon style', so what to choose for the third ride?
After I asked the guide whether he was serious about the possibility of riding upside down (he was), it seemed for some reason (probably the heat) like the right thing to do.
Partly, because I had too much fun on the first two rides and I wanted to do something that I hadn't done before and which also worried me a little.
Partly, due to the "Well, why not?" factor. (Trouble is, of course, that the next thought tends to be "What's the worst than can happen?". And, when you plan to hang on a rope from a cable about 350 meters above the ground while going at more than 100 km/h, it is not that difficult to think of things that could happen.)
But partly (and that line of thought made sense at the time, although it doesn't now), the 'Falcon' style means flying like Superman, bats are hanging upside down, so if I ziplined upside down, I would have been flying Superman-style and Batman-style. And that somehow felt appropriate.
So, back to the starting point, into the harness, feet up and ready to go.
You can't start fully stretched out, as you would hit the edge of the floor when leaving the little hut from where you start. (Not a problem when starting in lying position, but when you start sitting, they ask you to pull your legs up, so you don't hurt yourself.) So you grab the rope and bend your back, so you don't hit your head against something.


Ziplining upside down - so far, so good.
The plan was to stretch out, hang straight down and spread my arms - possibly only for a second or so, I don't think I would have dared to do it any longer, but that would have been enough for a nice frame grab from the video - but then I started to turn on the rope and couldn't get a grip on the handlebar with the feet, so they slipped off.


So it didn't quite work out as intended and I didn't get the picture I wanted, but did I have a bit of an upside down ride.
I then finished the ride in a more laid-back manner.


Next day it was time for some refreshment.
The timing was fortunate. It was a hot day - with 37°C the hottest during my stay in Italy - and I had booked an activity that kept me in nice, cool water.
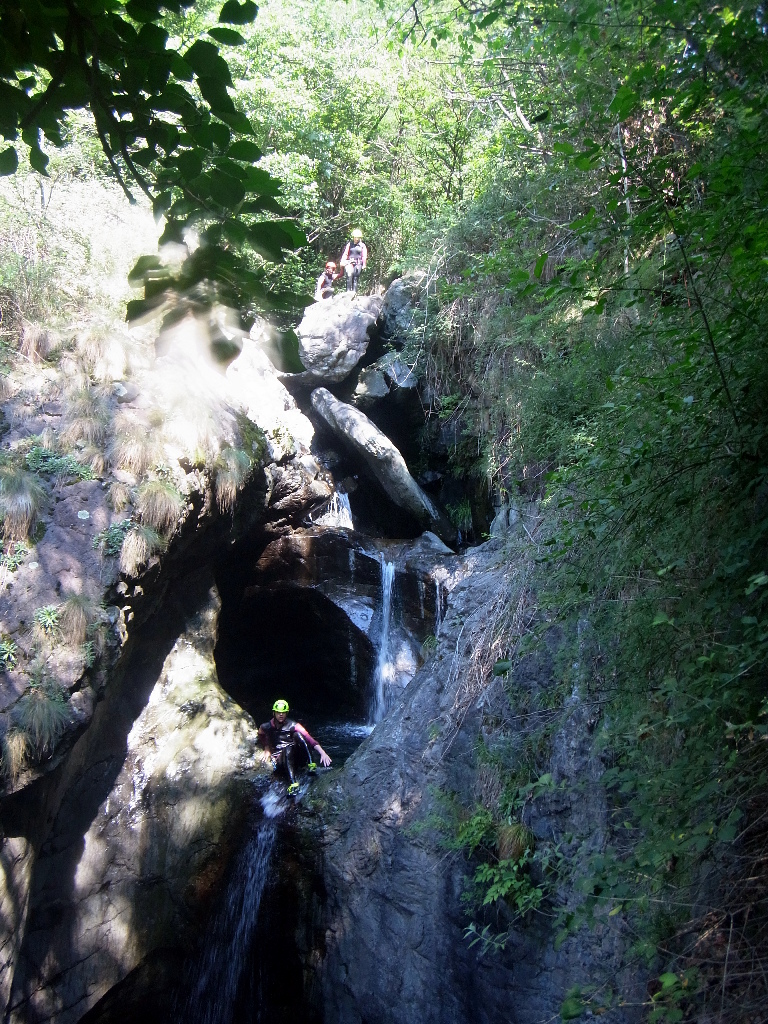
I had been canyoning in Italy before, but that was near Lake Garda.
Here at Lago Maggiore, I went for a mid-level skill tour (though among those, it was the easiest one).
It turned out to be a very relaxed tour.
The canyon doesn't have any difficult or spectacular bits - at least if you're abseiling, it is quite challenging for jumpers - so it is pleasant all the way, without any stressful bits. So, no impressive sounding abseils down 60 meter waterfalls, but lots of nice bits, variety and a great way to spend a day.
Though the canyoning method seemed unusual.
It seems a bit like it is for dogsledding (which I have done more than canyoning).
Every company has its own way of doing things. Usually they are neither better nor worse (as long as it is done consistently), but it means you can't get complacent and think "I know this, I've done it before". And you need to pay attention when they show how it should be done on their tour. (It's a bit like the announcements on airplanes, when they tell you "Please, even if you are a frequent flyer, listen carefully to the safety demonstration, as every aircraft might be different.", only that it applies here, unlike for airplanes, where it never does.)
For canyoning tours, they generally use an abseil-eight. You take that off the carabiner, put a loop pf the rope through the larger hole, slip it around the middle section of the eight and then clip the eight back into the carabiner.
Easy and straightforward.
There are only two disadvantages.
You need to take the eight fully off your carabiner when you slip the rope around it, so if you got wet fingers (as you do when canyoning) and you fumble, you could accidentally drop the eight and have it fall down the waterfall. There is a routine of handling the eight to avoid that, so it never is fully unattached, but that is a bit confusing and makes people more likely to do things wrong.
And on a normal eight, in theory the rope loop could slip over the upper part of the eight and make the rope lock up (called a lark's head hitch). It's unlikely to happen and it's a 'safe' failure in the sense that you don't fall, but it is hard to undo, as you are hanging with your weight on the rope and also can't use both hands to undo the rope jam. Also unlikely to happen and there are some of oddly shaped 'eights' with protruding spikes and 'ears' to reduce the risk of this happening.
Both (losing the eight and getting the rope locked up) rarely happen and can be fixed on guided tours without too much trouble, but on this tour, they used a Kong Oka descender instead. Which is an oddly asymmetrically shaped descender, looking more like a miniature Klingon weapon than an eight. Its main advantage is that you thread the rope loop through the large hole, but then run the rope through your carabiner instead around the lower part of the eight. And while you need to open the carabiner for a short moment to put the rope in, you never remove the descender (and you put the rope 'on top of it'), so there's little chance of losing it. Also, as the rope goes through the carabiner, it can't hitch up and lock itself.
The Oka also has some of other 'features', like an extra hole and some protruding spikes, but they are 'for professional use only' and meaningless to clients on a canyoning tour. (Those make the descender a 'rescue descender' by allowing to wrap the rope around these parts and increase the friction, in case someone has to abseil with a second person and needs more friction. Or put in another carabiner and lock the rope completely, so you take your hands off and assist someone. Good for guides, but nothing a client on a tour will ever do.)
Another unusual thing was the placement of the descender.
It is generally attached with a carabiner directly to the harness. But here there was a segment of rope between them, so it ended up about half a meter from the attachment loop on the harness.
When abseiling, it wasn't at chest level but ended up around head level.
The reason for that is that you need to make sure that you grip the rope below the descender and never above.
So if you are inexperienced and get ready for abseiling or suddenly take a hand off the rope (steadying you against a rock, for example), you might be tempted to grab the rope afterwards and not pay attention to grabbing it at the right place. Which is usually below your belt.
So by moving the descender further up, the risk of grabbing the wrong side of the rope is reduced.
While I see the point of that, it's not something I liked much.
It is difficult to do a 'walking' abseil (where you have the feet against the rock) with that. (And, in fact, we clients did only 'hanging' abseils on this trip.) You have a piece of metal with spiky bits hanging next to your face. And worrying about hair becomes more important.
On every tour, people with long hair, like me, need to tie the hair back, so it doesn't get into the descender. But with the descender right next to your head, you need to make double sure that no hair is hanging loose.
So the 'safety instructions' here clearly differed from others I had heard, but finally we were all set and ready to go.


The route started under a waterfall, which was an opportunity to get into the pool below, cool down a bit (neoprene suits are not ideal wear outside the water on a hot day) and take some 'before' pictures.


We started with a small descent to get some practice and make sure that everyone knew what they were supposed to do.

Then we went on to longer abseils.

The first one was followed by an opportunity to do a water slide afterwards.

Then more abseils down waterfalls. (Abseiling under a waterfall is always more fun than just going down some cliff face.)


Most canyoning tours also offer a couple of opportunities to jump from the cliff edge into the water.
An opportunity I tend to decline - I'm not that fond of jumping from any non-trivial height. But all canyoning tours allow not doing the jumps. Either they let you abseil down into the water or they have some walking path along the side of the canyon.
On this tour I only did two of the jumps, both from trivial heights. This is one of them:

While this one definitely wasn't:

The top on its own looks kind of ok.

The pool at the bottom looked ok as well.
But the combination is scary - it's roughly a 10 meter jump, you need to jump quite a bot forward to avoid hitting the canyon edge or the diagonal slab of rock, you can't really see the pool you are jumping into and there's another drop beyond the pool, so you shouldn't have too much forward movement either.
And you were supposed to have a running start on all jumps. (The reason behind this is that, if you take a standing jump and slip, you might hit some protruding rock below, as you are still next to the cliff face. If you are running and you stumble, you still have enough forward momentum to fall down a bit away from the rock.)
So, not at all something I would want to do.
The other two clients were less squeamish...
I rather enjoy the scenery and abseil down more waterfalls.
A couple of smaller ones first.


And towards the end of the canyon, two larger ones.


The last one was another jumping opportunity, where I abseiled down instead, while the other two were happy to take the faster way down.


I preferred to enjoy the scenery in a less rushing manner.


We had reached the end of the route and walked back to the cars, got out of our gear and drove the guides back to their car, which was parked near the beginning of the tour, and wiped the blood from my face
It was a bit embarrassing. After spending two hours of scrambling over rocks and hanging on a rope next to the canyon walls, all without any problem, I didn't notice a blackberry bush next to the hiking path back to the cars and walked right into a branch, scratching right across my cheek. Minor scratches, nothing serious, but after the canyoning tour, it felt ridiculous.

As we were done with the canyoning early in the afternoon, I had time to visit two of the islands in Lago Maggiore afterwards.
In short: Boring.
I took a boot to Isola Bella and then to Isola dei Pescatori.
Both are lined with restaurants along the shore and souvenir stalls along the street that connects them.
Isola Bella has the slight advantage of having a palazzo on it, which also has large gardens (covering about half of the island), which saves part of the island from being taken over by restaurants.
The trouble is that the islands are small (each about 400 meters long) - if you don't want to shop or dine, you've seen all there is to see in about ten minutes.
And the boats of each company (there are a few) run about once per hour.
Leaving you about 45 minutes of standing in the sun and the heat, wondering what to do.
The intent of the whole thing seems to be that you give in after a while and buy something or go to a restaurant to pass the time.


There's a backstreet going along the 'spine' of the islands, which offers a bit more shade.


There's also a good view towards the north side of the lake, which can keep you occupied for another two minutes.


And there's also the view over to Baveno.

Which is nice for postcards, but in real life not that nice of a view, as you can't as easily crop out the granite quarries right above the town.

Still half an hour to wait on the island until the boat arrives.
Only thing to do is stand around patiently and wait.
Bored.

The islands are nice for looking at from the outside, so the best would probably be to go on a boat, never get off, look at the islands and be back in Baveno half an hour later.
What I don't understand are the restaurants there.
They look like proper restaurants (probably are), but they should be bistros at best.
I don't see the point of going at noon to one of the islands and then have a full meal there. A piece of cake, a pastry, a panino - something you can eat in a hurry and gulp down or take with you when you notice your boat is arriving and you feel you don't want to nibble on the same sandwich for another hour. That would make sense.
Proper restaurants would make more sense in the evening, when you can relax, enjoy the calm of the evening, look across the lake to the scenery beyond.
But - most restaurants in the area open for dinner around 7pm.
And the boats stop operating around the same time.
So, unless you are staying on one of the islands (there is limited accommodation on them), have your own boat or privately arrange transport, you can't go there for dinner.
Strange arrangement.
Next day I went on a quad tour.
I had been hoping for a longer tour, but the only one available was a short two-hour ride.
There doesn't seem to be much of a call for quad tours in that area. I found out about the quad tours before I found out about the canyoning, so when I tried to make the booking, I had four days available as options. And the only tour in these four days was a short tour. With only two other clients on the tour (sharing a quad).
And while June is still pre-season, it's still a low interest in tours.
The two-hour tour is ok, but mainly a 'sightseeing' trip and not so much about quad driving.
You get your helmet, your basic instruction on how to ride a quad and off you go.


You drive for about 30 minutes along some back roads, along some regular streets through a village and then along a gravel road to a popular viewing point, close to the 'alpine gardens' above Stresa.
From there, you have a good view across the lake and of the islands (which look nice when you're not on them).


And then we drove back along the same roads.
About 3 km before being back at the starting point, we turned right and drove along a street to an 'Agriturismo' where we had lunch (an assortment of different local bacons, 'speck', local sausages, and some cheeses, which was quite good - it was the kind of eating place that they should have on the islands during noon).
After lunch, the plan was to drive up Monte Scincina, which is nearby.
Technically, the track was a bit more interesting. It wasn't really tricky to do, but you had to pay a small bit of attention which line you were taking with the quad.
Which was interesting for about 600 meters, after which my quad stopped going. The chain had jumped off the cogwheel (the drive mechanism is quite like on a bicycle) and the guide had to re-attach it.
Which held for about another 200 meters, when it jumped off again.

The guide then decided that my chain was to loose and we couldn't go on, so we turned round and drove home again. Which is, in retrospect, a pity. Looking at the GPS trail, we only had another 200 meters driving distance to go to the summit (it was, literally, around the next corner), so if there's some interesting view from there, the guide might at least have taken the other two clients up there and either leave me with my quad or give me a ride on the back of his. But I don't know whether the summit was the destination and point of return or whether the idea was to take another trail towards their 'base' from there, which might not have been safe with an unreliable quad.
In any case, once we were back on the road, we switched quads (the guide took mine and I drove on his) and five minutes later we were back at the starting point and the tour was over.
Quite ok for a quad sightseeing tour and it was fun driving a quad again, but I would have liked to do a longer tour and have a bit more 'interesting driving' along the way.
As this was a short tour, I had some time to drive to Lago d'Orta, a smaller lake on the other side of a small mountain range. It's a nice lake and well worth a look, a sort of smaller, quieter sibling to Lago Maggiore

Next morning, I went to Stresa, the next town southwards along the shore from Baveno took the cable car
While the previous days had been clear skies pretty much all day, there were some clouds in the mountains, which suited me fine.

I wanted to do some walking in the mountains and that's a bit nicer when it's not too hot.
There's a cable-car from Stresa up to Mount Mottarone, so the idea was to take the cable-car up and then walk back to Baveno from there.
But before starting the walk down, there was something to do at the top - Alpyland.
This is a kind of 'self-drive rollercoaster', quite similar to the one I used in Portugal.
It's like a regular rollercoaster, but you got a little brake, so you can control the speed with which you are going. As a result, it has a larger capacity then a normal rollercoaster, as that usually only allows one 'car' on the track at any time (because, if anything goes wrong and a 'car' stops, the next one would run right into it). But with braking, the following drivers can stop if they see trouble ahead.
As I had been going up the mountain with the first cabin of the day, so I managed to be the first customer on the rollercoaster.

Which was nice, as there was no one in front of me, so I didn't have to adjust to the speed of the coaster to one in front of me and I could go any amount of braking I liked (which was none).


It's a track with a good layout - lots of curves and bends and also a couple of surprising banks on a otherwise straight looking bit.


And the location is amazing - the clouds were rolling in when I took the pictures of the track, so it is not that obvious from the previous five pictures, but the three 'along the track' pictures above that give an indication of the view, which must be even more amazing on a cloudless day.
Then it was time to walk back down to Baveno.
It's a fairly long way down.
The altitude difference between the top of Mount Mottarone and Baveno is roughly 1300 meters, so it's like walking down from the observation deck of the Eiffel Tower about five times.
Still better than walking up.
At the beginning, the clouds were still coming in, so the temperatures were pleasant for walking.


For the first half, the path was well marked and easy to walk, with some great views along the way.


There was a steep bit around the summit of Monte Zughero, but that was still 'walkable'. It didn't require the use of your hands to steady yourself. And it was only about a walking distance of about 300 meters (while going up 40 meters to the summit and down again).
Shortly after that, the small, rocky path turned into a wider gravel road through a forest.
If I had continued to Stresa, the trail would have turned after two kilometers into the one I had used during the quad tour during the previous day. And shortly afterwards to the intermediate station of the cable car, giving me the option to ride the cabin back down to Stresa or walk down along some roads.
But I turned off that gravel road near Alpe Vedabia, following the signs to Baveno.
The path becomes smaller again and for most of the rest of the way it's a small downhill trail through the woods.
After about a kilometer, there is a choice between two paths to Baveno - via the M2 trail and the M3/A trail. Both looked (on the map and on the ground) pretty similar, so I went more or less at random left with the M3/A.
When I went off the trail to Stresa, I was still 600 meters above Baveno and roughly three kilometers distance, so while it wasn't a steep descent, it meant that I had to pay attention to where I put my feet. By now the clouds had mostly gone and it was early afternoon, so even in the shade of the forest it was getting warm.
So I was going a bit slower than I expected and it took more than an hour until I reached the outskirts of Baveno.
All in all, it was a nice walk down from Mount Mottarone (and I was glad that I didn't attempt to do it in the other direction).
And that was essentially all I did around Lago Maggiore, as I drove back to Milano and flew home the next day.